


THE SCRAPYARD GAMING PC CHALLENGE – RESULTS

8 weeks ago, I challenged my friend Dave to build the fastest gaming PC possible, for £450. A decent gaming rig usually costs over £1000, so this would be a good test of our hardware and overclocking knowledge. Unable to turn down a challenge, he accepted, and we agreed a prize of £50 Steam credit – and the kudos of building the fastest PC.
If you haven’t already read part 1, you can read it here.
BUILD SPECIFICATIONS
| Dave | Nick | |
|---|---|---|
| CPU | Intel i7 4970K | Intel i5 6500 |
| GPU | Asus Strix GTX 980 TI | Gigabyte R9 290 Windforce OC |
| RAM | Corsair Vengeance Pro 16GB DDR3 2400MHz | Kingston Hyper X Predator DDR4 16GB |
| Motherboard | Gigabyte GA-Z97-D3H | Gigabyte Z170 Gaming K3 |
| Disk | Samsung EVO 850 SSD 250GB | SanDisk SSD PLUS 120GB |
| Power supply | Corsair CXM 600W | Corsair GS600 |
| Cooling | Corsair Hydro Series H60 | Cooler master 103 |
| Case | Corsair Carbide Series 200R | Bitfenix Nova |
BENCHMARK RESULTS
| Dave | Nick | |
|---|---|---|
| Firestrike 1.1 Overall | 15866 | 11069 |
| Unigine Valley Score | 4524 | 2835 |
| UserBenchmark Multi core | 703 | 561 |
| UserBenchmark SSD Random 4k (MB/s) | 66.1 | 34.6 |
| UserBenchmark RAM Multi core (GB/s) | 29.5 | 31.7 |
| Cinebench CPU | 915 | Nick “lost” his scores |
| Cinebench GPU | 143.11 | N/A |

THE GRAPHS

Firestrike is a GPU-intensive 3D demo by 3D Mark, designed to strain even the most powerful GPUs. Not only did my 980 TI outperform the R9 by around 30%, Nvidia’s PhysX rendered every particle beautifully and gave everyone watching an impressive visual display.

Unigine Valley is another well-known GPU-intensive 3D demo, and no surprises, the 980 TI beat the R9 again, this time 37% faster.

GPU performance aside, how did the other components compare? Userbenchmark showed that the i7 was 20% faster than the i5. The Skylake i5 really gave they aging i7 a run for it’s money.

The SSD scores were a bit of surprise. The technical specs of the SSDs were very similar, and in standard read/write operations, performed as expected – and were in fact quite closely matched. However, the more expensive Samsung EVO 850 was almost twice as fast at random reads across the drive.

Finally, we compared RAM throughput. Each of our CPUs and motherboards were overclocked (Mine more-so than Daves setup), and while we expected the DDR4 RAM to outperform the DDR3 RAM, we hadn’t expected the results to be so close. The DDR4 RAM was 0.9GB/s faster than the DDR3 equivalent.
COSTS
| Dave | Cost | |
|---|---|---|
| CPU | Intel i7 4970K | £204 |
| GPU | Asus Strix GTX 980 TI | £587 |
| RAM | Corsair Vengeance Pro 16GB DDR3 2400MHz | £52 |
| Motherboard | Gigabyte GA-Z97-D3H | £43 |
| Disk | Samsung EVO 850 SSD 250GB | £60 |
| Power supply | Corsair CXM 600W | £50 |
| Cooling | Corsair Hydro Series H60 | £59 |
| Case | Corsair Carbide Series 200R | £52 |
| Total cost | £1107 |
| Nick | Cost | |
|---|---|---|
| CPU | Intel i5 6500K | £139 |
| GPU | Gigabyte R9 290 Windforce OC | £150 |
| RAM | Kingston Hyper X Predator DDR4 16GB | £66* |
| Motherboard | Gigabyte Z170 Gaming K3 | £75 |
| Disk | SanDisk SSD PLUS 120GB | £32 |
| Power supply | Corsair GS600 | £22 |
| Cooling | Cooler master 103 | £19 |
| Case | Bitfenix Nova | £26 |
| Total cost | £533 |
* The supplier mistakenly dispatched 16GB, rather than 8GB, so Nick’s RAM actually cost £33 for 16GB.
CONCLUSION
£533 vs £1107. No contest. Dave’s GTX 980 TI was more expensive than the rest of the components combined! Remove the GPUs from the equation, £383 vs £520 – a 30% difference, and the i5 setup narrowly wins on a performance/£ basis (by about a 5% margin). My final build doesn’t “look” budget, and these results certainly aren’t budget either. The cheap case, cooler master, and budget PSU were all solid choices, and the benchmarks show the i5 is still a very capable processor. Dave’s PC, sans GPU, is a slightly higher-spec budget PC. The large 200R case, modular PSU and over-the-top watercooler were bought specifically with future upgradability in mind (after he splurged on the GPU, and blown his chances of winning – so he didn’t feel so bad).
 So, I Won
4k CONSOLES XBOX ONE S VS PS4

As I wrote about earlier in the year, both console manufactures released a revised console in time for Christmas. This time both aspiring to bring 4K to the masses.
Sony has finally released its much-talked about PS4 Pro and its a whole new beast, much more powerful than before.Microsoft released more of a gentle revision Xbox One S. The comparison is slightly unfair but they will be drawn none the less.
Microsoft will be introducing its own beefier machine in 2017, but in the meantime we expect many people will be looking at the Xbox One S and PS4 Pro, wondering which of the two to invest in this year rather than next. So lets look at a big talking point 4k and HDR
Xbox One S vs PS4 Pro: 4K HDR gaming
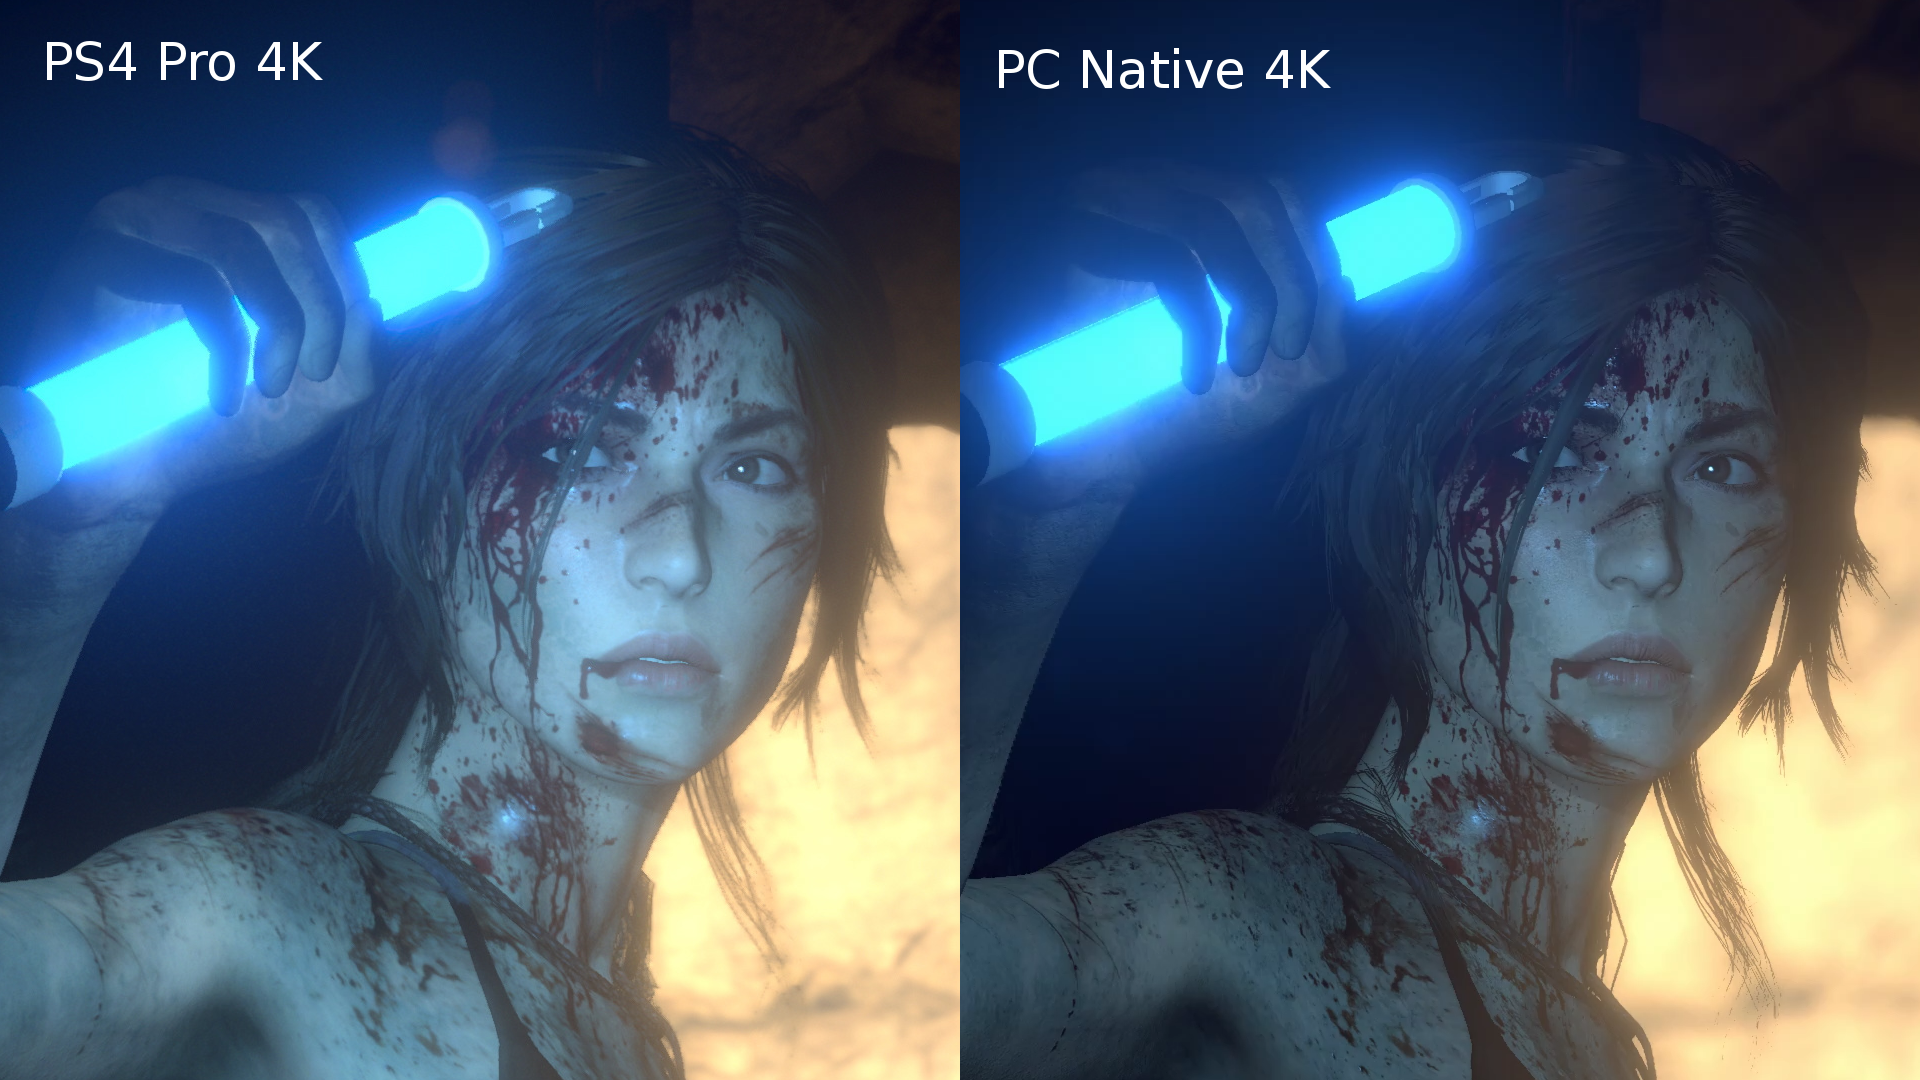
Ever since the PS4 Pro was first announced, Sony has shown plenty of games running in 4K with high dynamic range (HDR) picture processing. We’ve played quite a few ourselves and been impressed. The console is even capable of playing games natively in 4K.
The Xbox One S on the other hand is not capable of 4K gaming. It does upscale all video output to 4K, including games, but you don’t get any more detail – it just takes on the upscaling duties rather than rely on your TV’s abilities.
The Microsoft machine does offer HDR gaming though. Developers can now choose to offer a greater level of contrast and a wider colour gamut in their games, for users with TVs capable of showing them. Forza Horizon 3 a Gears of War 4 are two games coming with HDR graphics. The PS4 Pro has around 30 4K HDR enabled games available at launch.
Xbox One S vs PS4 Pro: 4K Ultra HD Blu-ray
One of the main reasons existing Xbox One owners would consider an upgrade to the Xbox One S is that it also doubles as a 4K Ultra HD Blu-ray player. It is capable of playing the new format discs and in HDR to boot.
This is one where the Xbox One S is better than the Sony powerhouse. Remarkably, even with Sony’s heritage in the format and being one of the major drivers of 4K Blu-ray, the PS4 Pro does not have a 4K Ultra HD drive so cannot play the discs.
Xbox One S vs PS4 Pro: 4K video
As well as 4K Blu-ray support, the Xbox One S is also 4K-ready for streaming services. At present, that just means Netflix and Amazon, but we fully expect an updated YouTube app soon. The PS4 Pro can happily play 4K (and HDR) content, but only the Xbox has an Ultra-HD Blu-ray player built in.
Even though the PS4 Pro doesn’t have a 4K Blu-ray drive, it does come with Netflix in 4K from launch. YouTube too. We’re expecting HDR from both soon.
Xbox One S vs PS4 Pro: Performance
This is where things really start to head in different directions. In effect, the Xbox One S is a slightly tweaked version of the former model. Its quad-core processing chip is clocked higher in order to run faster and offer a boost in performance, but it is fractional. RAM also runs faster too, but the most obvious improvements come with faster menu screens than in-game activities.
On the other hand, the PS4 Pro sports an octa-core processor and a graphics chipset with 4.20 teraflops of power. There is also 8GB of GDDR5 memory. The PS4 can apparently play games in 4k but given the specs I would speculate its not native 4k and is actually some kind of up scaling
In comparison, that’s like having a drag race between a Ferrari and an Audi A5. Yeah the Audi A5 is a lovely car… but it’s no Ferrari.
Xbox One S vs PS4 Pro: Design
The white One S is 40 per cent smaller and thinner than its former generation, with the power supply now tucked away inside the main casing. It is, in fact, one of the best looking consoles on the market.

The PS4 Pro also has the power supply inside but is chunky and less sleek than the Xbox. It’s even larger and heftier than the original, standard PlayStation 4.
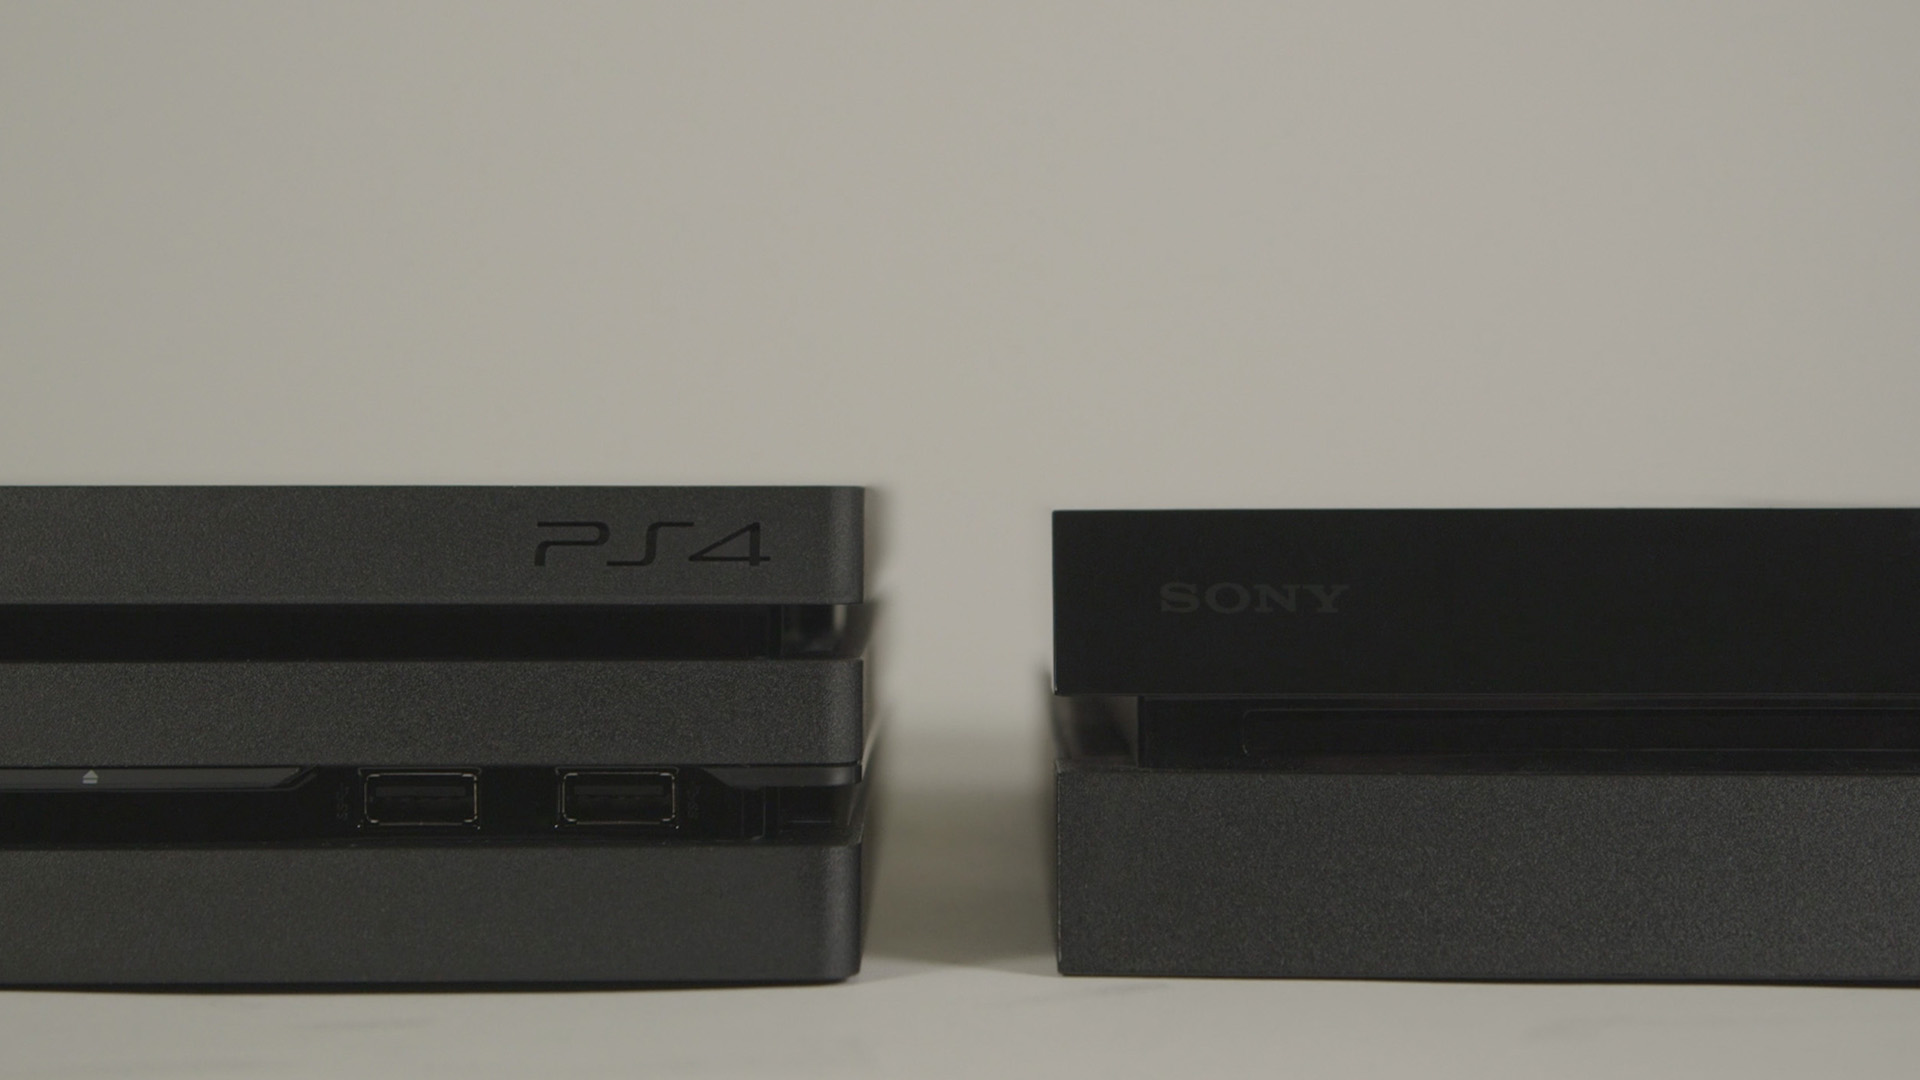
Consider its spec is more akin to a gaming PC, then imagine how big a decent gaming rig can be thanks to sufficient cooling and you can see why the PS4 Pro is on the beefy side. You’re basically swapping looks for power.
Xbox One S vs PS4 Pro: Price
The Xbox One S, available here, is priced at a very reasonable £249 for the 500GB model, £299 for the 1TB and £349 for the 2TB edition, although the latter is now completely sold out.
It could be said that the bigger bargain is the PS4 Pro, available here. At £349, it almost matches the top end Xbox One S, but it is a far more powerful machine. It only comes with a 1TB drive though.
NEXUS 5X REVIEW
https://www.youtube.com/watch?v=R1CbZSK-zMk
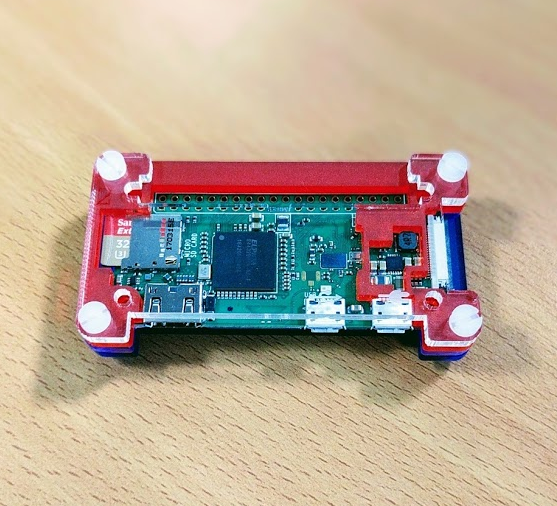
RASPBERRY PI ZERO GAMES CONSOLE

I have a Raspberry Pi Zero W, I’m a huge nerd. It was inevitable… I made a game console
Last November, Nintendo released the Nintendo Classic Mini, a mini console with 30 built in retro NES games. After playing one at Christmas I was impressed with the device. I searched high and low, but stock levels and popularity meant that these little things were going for double or triple the price on eBay. everywhere I looked it was sold out. I waited for a few months for one to become available and then Nintendo announced that they were going to discontinue them.
 Undeterred I decided I would build my own emulator and after looking around I decided the Raspberry PI Zero W would do the trick. The build was really easy, below are the steps I followed.

The Raspberry PI Zero W, was launched earlier this year and is an updated version of the standard Raspberry PI Zero. The updates are fairly innocuous but consist of some handy new features such as built in Wifi and Bluetooth 4.0. The PI Zero in it self is positively minuscule. I was surprised at how small when it arrived. Because I was starting from scratch I wanted to try and emulate more than just NES games.

The Megadrive along with the SNES were the consoles I remember most growing up. My sister and I spent way to much time playing Sega and Nintendo games when we were younger.

On to the build.
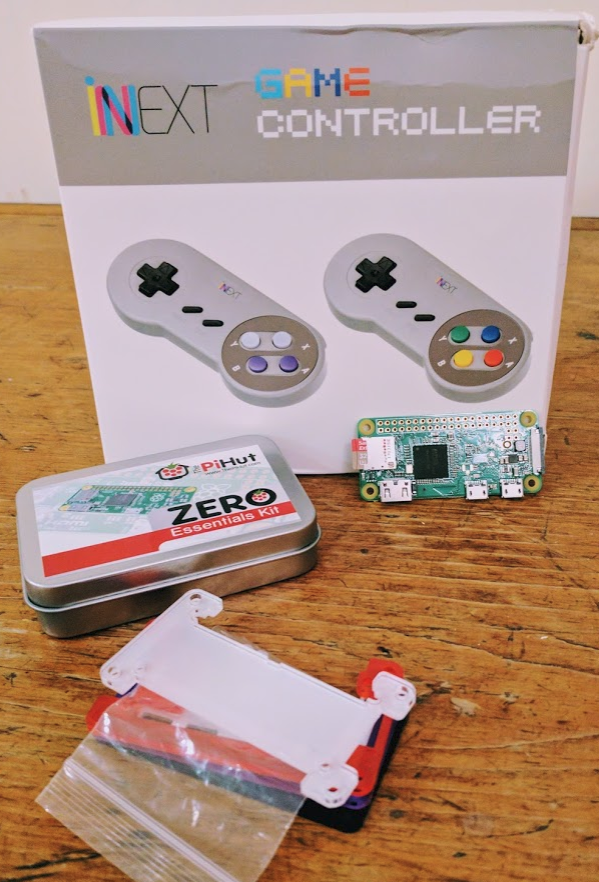
To create a mini emulation console you are going to need a few things. The PI hut do a kit with some of these items or you can shop around
- Raspberry PI Zero W (https://thepihut.com/products/raspberry-pi-zero-w )
- Mini hdmi – HDMI converter
- Micro usb to USB 2.0 converter
- USB or Bluetooth controllers http://amzn.to/2rsN5ss
- Micro SD Card (8gb or above) http://amzn.to/2qy0Ruw
- 5V 2A PSU or Micro usb power cable (standard phone charger type)
- A Case (selection here https://thepihut.com/collections/raspberry-pi-cases)
Next up the tech bit.
Download the SD image for your version of Raspberry Pi from the following page:
https://retropie.org.uk/download/
Extract
Once you have downloaded your SD card image you need to extract it using a program such as 7-Zip. You will extract the downloaded .gz file and the extracted file will be a .img file.
To extract from the command line, you can type the following into a Terminal window, placing X with version you downloaded:
gunzip retropie-4.X.X-rpi2_rpi3.img.gz
Install
To install the RetroPie SD image on your MicroSD card. (You may need a MicroSD card reader to plug it into your computer)
- For Windows you can use a program called Win32DiskImager
- For mac you can use Apple Pi Baker
- For Linux you can use
ddcommand or Etcher
Note RetroPie is built on top of Raspbian (a linux based OS for the Raspberry Pi) and as such the partition on the SD card is EXT4 (a linux filesystem) which is not visible on windows systems, so the card will show up as a smaller size than usual and you wont be able to see everything on the card
Configure Controllers
On first boot your filesystem will be expanded automatically, you will then be welcomed with the following screen- this menu will configure your controls for both Emulationstation and RetroArch Emulators: If you wish to configure more than one controller, you can do so from the start menu

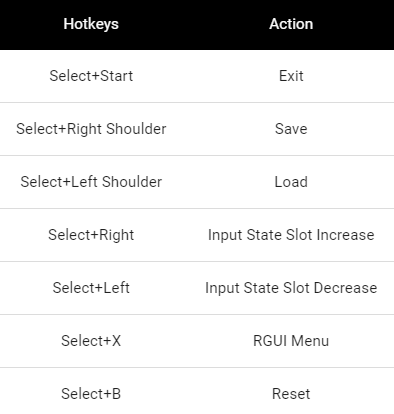
Hotkeys
Hotkeys enable you to press a combination of buttons to access functions such as saving, loading, and exiting emulators
Roms
Roms can be found all over the interweb but I found that https://www.emuparadise.me comes highly recommended. Physically transferring the ROM’s could not be more straightforward. You can write directly to the ROMS folder on the SD card, but I have found after adding the PI to my wifi navigating to //RETROPIE and find the corresponding ROM folder and then drag and drop.
PLAY!
After you’ve added your roms you need to restart emulationstation in order for them to show up. You can restart emulationstation from the start menu, or by rebooting your pi with sudo reboot.
CONSOLES TO GET 4K?

With the increasing push of 4K TVs and more native 4K content sources appearing week by week, the PS4 and Xbox One are starting to look more and more uncomfortable as they via for top spot as the number one box in your living room.
Netflix were the ones that started the rumour at last year’s Consumer Electronics Show iwhen, according to The Huffington Post, Netflix’s Chief Product Officer Neil Hunt suggested during a press conference about Netflix’s support for High Dynamic Range technology that Sony had ‘promised’ a PS4 hardware revision that would give the console 4K video capabilities.
Then during his Xbox Spring Showcase event keynote last week, Microsoft’s head of Xbox Phil Spencer talked about future of “hardware innovation” for the console, similar to the ways PCs evolve.
In a speech to reporters, he said that the Xbox One could see a future in which it is upgraded, rather than replaced by new consoles.
One last point to stress is that if the predictions of new 4K-capable consoles this year come true, the upgrade will almost certainly only affect video streaming; 4K gaming at the moment requires a high-end PC and would probably be to costly to bake into a console for a reasonable price. Sony or Microsoft have not confirmed or denied anything specific yet but I would expect to see a potential update that would allow at the very least 4k streaming with an upgraded chipset and HDMI ports
Macbook Air 2008 replacing the battery

So do you own a Macbook air with a dead battery? So did I, a few days ago my Wife purchased a Macbook Air 2008 for relatively cheap on ebay. The purpose of which was to use for writing her own blog and novel. Main requirements were light weight, good battery life… The Macbook Air in question was a bargain with a dead battery.

Replacing the battery on these is pretty straightforward. You need to ensure you get the correct model battery as they have changed the connection port a few times. The easiest way to do this is using the guide on Apples website : http://support.apple.com/kb/ht3255
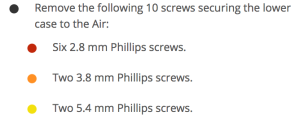
I used the following search term on ebay to ensure I got the correct model. MacBook Air Models A1237 battery. Once ordered and you have the battery you need to remove the bottom case.

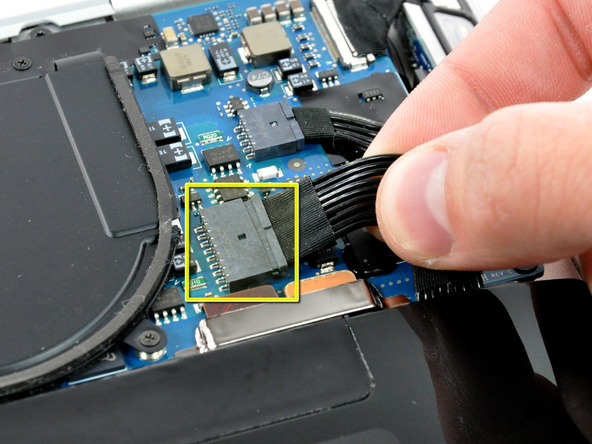
The locate and disconnect the power cable (be careful the pins are delicate )
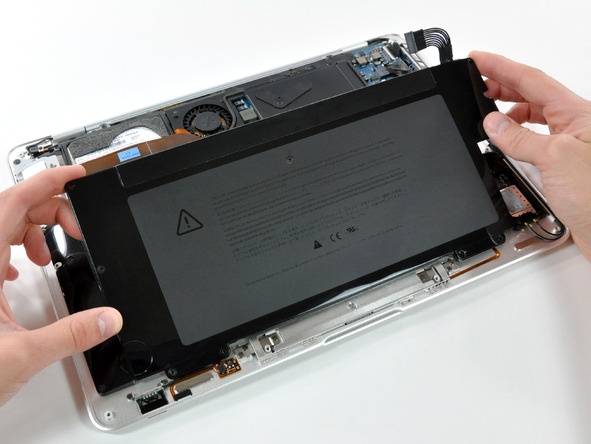
Pop in the new battery.
Re secure the bottom case
Switch on to test.
THE SCRAPYARD GAMING PC CHALLENGE

4 weeks ago, I challenged my friend Dave to build the fastest gaming PC possible, for £450. A decent gaming rig usually costs over £1000, so this would be a good test of our hardware and overclocking knowledge. Unable to turn down a challenge, I accepted, and we agreed a prize of £50 Steam credit – and the kudos of building the fastest PC.
THE RULES
- £450 only applies to the PC case and contents (peripherals are excluded).
- Hardware must be purchased. Use of existing spare hardware is prohibited.
- Postage is not included. (I don’t remember agreeing to this, but Nick insists I did)
- Benchmarking will occur on May 4th 2016, and will consist –
- Userbenchmark
- Cinebench
- 3DMark (firestrike)
- Unigine Valley
- Each benchmarking tool will be run 3 times, and the best score used.
- Failure to achieve a score, due to crashing, will result in disqualification.
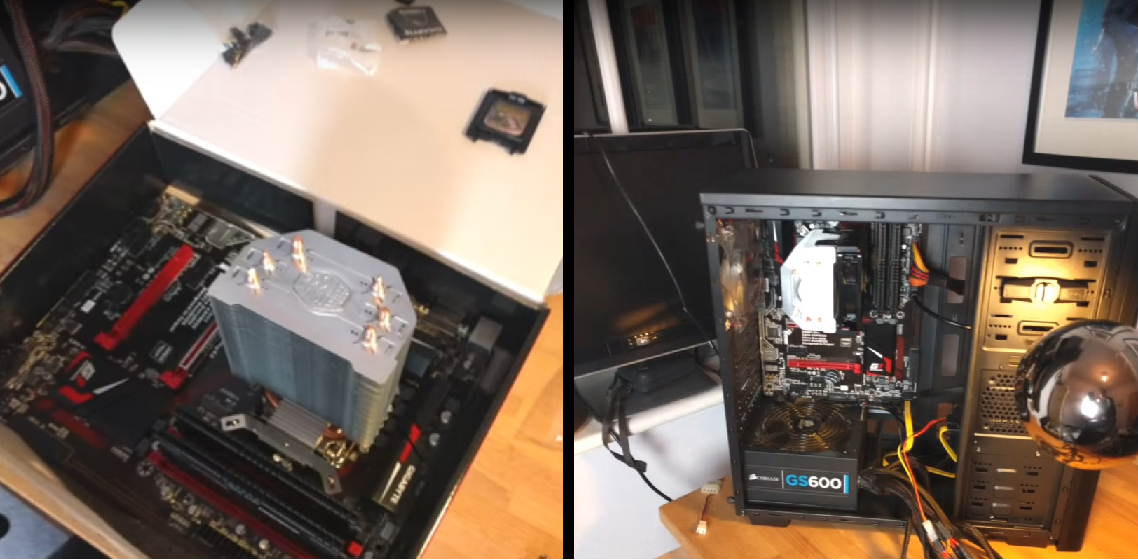
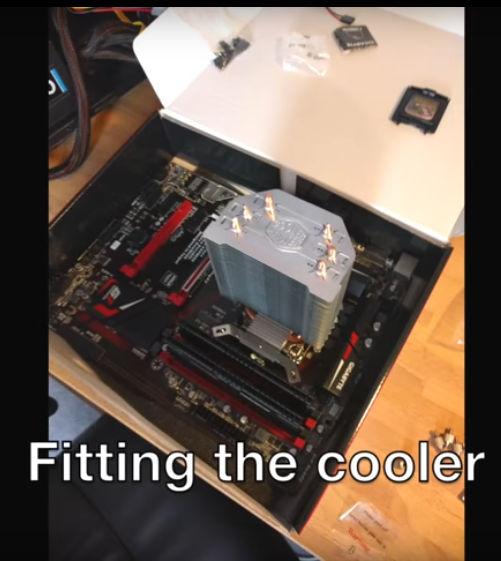
GETTING STARTED
For the first week or so, every conversation I had with Dave was about hardware. We spent all of our free time researching CPUs, RAM, motherboards, cases, PSUs, trying to determine the cheapest combination to deliver the biggest bang for buck. I can remember one evening Dave was bidding wildly on an eBay auction, thinking, “I was probably the other guy bidding against him!”. In the following days, I read numerous articles about overclocking, and how to squeeze the most performance out of the new Skylake I5 6500 processors as I had heard that you could overclock the none K version to astonishing results and I went for the new motherboards that supported this new chip set and DDR4. Dave went for slightly older hardware. Eventually he settled on an i7 4th gen, socket 1150 motherboard, and DDR3 RAM.
First to arrive was the ex-display Gigabyte Z170 Gaming K3, My new Intel i5 6500 came from Japan via playasia and Amazon messed up and sent me 16GB of Ram by mistake I had only ordered 8 🙂
FINAL BUILD SPECIFICATIONS
| Dave | Nick | |
|---|---|---|
| CPU | Intel i7 4970K | Intel i5 6500 |
| GPU | Asus Strix GTX 980 TI | Gigabyte R9 290 Windforce OC |
| RAM | Corsair Vengeance Pro 16GB DDR3 2400MHz | Kingston Hyper X Predator DDR4 16GB |
| Motherboard | Gigabyte GA-Z97-D3H | Gigabyte Z170 Gaming K3 |
| Disk | Samsung EVO 850 SSD 250GB | SanDisk SSD PLUS 120GB |
| Power supply | Corsair CXM 600W | Corsair GS600 |
| Cooling | Corsair Hydro Series H60 | Cooler master 103 |
| Case | Corsair Carbide Series 200R | Bitfenix Nova |
BENCHMARK RESULTS
| Dave | Nick | |
|---|---|---|
| Firestrike 1.1 Overall | 15866 | 11069 |
| Unigine Valley Score | 4524 | 2835 |
| UserBenchmark Multi core | 703 | 561 |
| UserBenchmark SSD Random 4k (MB/s) | 66.1 | 34.6 |
| UserBenchmark RAM Multi core (GB/s) | 29.5 | 31.7 |
| Cinebench CPU | 915 | Nick “lost” his scores |
| Cinebench GPU | 143.11 | N/A |
WHO WON? Read Part 2